Thursday, December 16, 2010

Cashew Puffies

This is my favorite cookie e-v-e-r. I have been making these for so many years that I can't even remember when I first started making them. I can only assume it was around the time that I bought the cookbook, which was in the late 90's. They have a wonderfully nutty flavor, but they are so light and airy! They aren't overly sweet and they are so full of flavor. I look forward to making them every year. In case you are interested in where this recipe came from, you can find it in "Rose's Christmas Cookies". A fantastic cookbook full of amazing holiday cookies.

Cashew Puffies

1 1/3 cups unsalted cashews, coarsely chopped
2 cups all purpose flour
3/4 teaspoon baking powder
3/4 teaspoon baking soda
1/4 teaspoon salt
3/4 cup + 2 tablespoons firmly packed light brown sugar
1/2 cup (1 stick) unsalted butter
1 large egg
1 teaspoon pure vanilla extract
1/2 cup sour cream

preheat oven to 375 degrees.

If you cannot find unsalted cashews you can buy the salted cashews and rinse them under hot water. Spread them on a baking sheet and bake them for 10 minutes in a 350 degree oven to dry them out a little. Cool them completely before chopping.


The method I followed for this recipe used the food processor. If you prefer to use a hand mixer I will provide additional instructions at the end for that method.

Sift together the flour, baking powder, baking soda, and salt in a small bowl.

Whisk to ensure that everything is thoroughly combined.


Add the cashews and set aside.


Process the sugar in the food processor until it is very fine. Cut the butter into pieces and add to the sugar mixture while the motor is running. Process until it is smooth and creamy.


Add your egg and vanilla extract and mix until just incorporated.


Scrape the sides of the bowl and then add the sour cream. Process again briefly just to mix in the sour cream.


Add the flour mixture. Pulse it in a few times until the dough comes together. It should happen very quickly.


Cover your baking sheets with parchment paper (or use a very good nonstick pan). Drop the dough by teaspoons (I like bigger cookies so I used about a tablespoon per cookie), 1 1/2 inches apart.


Bake for 10-15 minutes or until lightly golden brown.


Cool for a couple of minutes on the sheets and then transfer to a wire rack to cool completely.


The recipe says that it makes 6 dozen 1 3/4 inch cookies, but I always make mine double the size that the recipe calls for :) Make them whatever size you like!


These are so yummy! You will love them!

**If you want to use a hand mixer, you will follow the same directions as above except you will want to soften the butter first (not melt) and then cream the sugar with the butter. Once you cream the butter and sugar you will add the egg and vanilla and mix to combine. Beat in sour cream and then add the flour mixture.

Monday, December 13, 2010

Turkey Tenderloin, Red Skin Garlic Mashed Potatoes and Breadstick Wrapped Asparagus

I wasn't sure what we were going to do for dinner tonight so I stopped at the store to just grab a few things. I knew that I wanted to take the easy way out and just toss a pre-marinated turkey tenderloin in the oven, but I had no idea what to make with it. More specifically, I had no idea what type of vegetable I wanted to make with it. While I was standing in the produce section I noticed that the asparagus looked really nice! I remembered seeing a blog post on Big Girls, Small Kitchen where they catered an event and made puff pastry wrapped asparagus with a little dusting of parmesan. When I saw that post I thought it looked so cool! That was the inspiration for my breadstick wrapped asparagus.

We can start by talking about the turkey tenderloin.

This was foolproof and works well on nights when I don't have anything planned for dinner. I picked up an Italian herb marinated turkey tenderloin. Toss it on a baking sheet and bake @ 325 degrees for about 50 minutes. Nothing to it!


Once that was in the oven I could focus on the rest of the meal.

The potatoes were pretty basic as well. I actually boiled small red potatoes (maybe 2.5 pounds) with the skin right on them. Once the water comes to a rapid boil, add about 2 tablespoons of salt (yes that much) to the water and put the potatoes in the pot. Boil until the are fork tender (about 25-30 minutes).


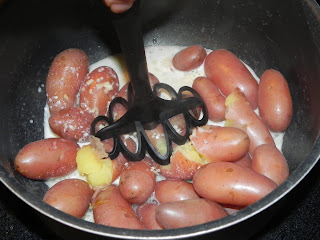
Drain the potatoes and return them to the pot. In a small pan warm 3/4 cup milk, 3 tablespoons of butter and 3 cloves of garlic (or 2 teaspoons minced garlic from a jar). You only need to warm it, don't make it boil. Pour the milk over the potatoes and mash them with the potato masher. You can also add 1/4 cup of freshly grated Parmesan cheese (which is fantastic!). Taste them to see how your seasoning is. You may want to add a little salt & pepper. Sprinkle some fresh parsley on top.


The asparagus was my favorite part of this meal!


Trim the ends of the asparagus first.


Blanch them in salted boiling water for 3 minutes and then shock them in ice water to stop the cooking process.


You don't want them cooked all the way now, or they will be all soggy after they bake in the oven. You just want to take a little of the crunch off of them and set in their beautiful green color. Once they are nice and cool from their bath, dry them on a paper towel and set aside. Make sure they are pretty dry before your proceed because you don't want the bread stick dough to get soggy.


Take the refrigerated bread stick dough out of the can, it should look like this.


Most cans have 12 pre-cut bread sticks. You want to cut each of them in half to make a total of 24 strips. This worked out perfectly for the number of asparagus that came in the bunch at the store :)

(there are 12 more that aren't shown)

Starting at the base, wrap the bread stick dough up the asparagus and then place on a parchment paper lined baking sheet.

Once they are all wrapped, melt 2 tablespoons of butter in a small dish with 1 teaspoon of minced garlic.


Brush the melted garlic butter on the top of the wrapped asparagus and then sprinkle with a generous amount of kosher salt, pepper and little garlic powder.


Bake in the oven @ 375 degrees for about 15 minutes, or until golden brown. I turned up the temp on the turkey tenderloin for the last 15 minutes when these cooked and everything turned out perfectly!


These were a-m-a-z-i-n-g! These could hold their own as an appetizer with a dipping sauce...


Enjoy!


Sunday, December 12, 2010

Rutabaga Fries

I like to step outside the box a little with my cooking. I am at the point where I am starting to really feel comfortable with the things I "usually" cook. I think I have gotten too comfortable, though. I really like to try and find new or unusual things to cook because it is the only way that I will ever learn what other amazing foods are out there! I always knew what a rutabaga looked like and I had passed them in the grocery store a million times over the years, but I had never cooked one before. I had NO idea what they tasted like or what to do with one. I tossed it in my cart and decided that I would just have to figure it out. I have to admit that I was slightly turned off by the very waxy and strange looking coating on the outside. I turned to my best friend, Google, for a little advice on what I could make with it. I saw many recipes using the rutabaga just like a potato. I figured I would turn them into french fries! After a little more research on the rutabaga I also learned that the rutabaga has half the calories and carbs of a potato. I was starting to love them already and I hadn't even eaten it yet!

Rutabaga Fries


Preheat the oven to 375 degrees

I attacked the rutabaga with a peeler and removed the gross, waxy coating that was covering it.


I immediately noticed a familiar scent; it smelled strangely similar to a turnip. I could tell there would be a little bitterness just by its scent. You could also smell a spicy bite, almost like a radish. I must warn you that they are incredibly hard to cut! They are hard like a sweet potato and it was difficult to cut through it. Be very careful and try not to cut yourself!

I decided to cut them like steak fries. Try to keep them all around the same thickness so they cook in about the same amount of time. You wouldn't want some of them cooked and others still raw inside.


Once they are all cut, place them on a baking sheet and drizzle them with a little olive oil. Use your hands to toss them all in the oil and then sprinkle them liberally with kosher salt and pepper on both sides. Keep them in a single layer so they cook evenly.


Bake them in the oven for about 40-45 minutes. You will want to flip them once or twice during baking to make sure both sides crisp up.


They were *really* good! I am very happy that I tried them. I know there are lots of ways I could use the rutabaga in the future :)


I think next time I would cook them at a higher temperature and maybe use canola or vegetable oil to try and achieve a slightly crispier exterior.

I served them up with a horseradish dipping sauce. I just mixed a little horseradish sauce with sour cream, grated onion, a pinch of salt, pepper and garlic powder. Tasty!


Friday, December 10, 2010

Sun Dried Tomato and Parmesan Bread

Okay, I promise that after this I will try to take a little break with all the bread posts. I had some leftover boule dough in the fridge and I decided to make one of the other recipe variations in the "Artisan Bread in Five Minutes a Day" book. For this recipe you can literally use the boule dough that we made and just add the sun dried tomatoes and parmesan for a whole new bread! If you followed the initial recipe it had enough dough to make 4 loaves of bread and store the remaining dough in the refrigerator. All I had to do was pull some of the reserved dough out of the fridge and voila.....another wonderful bread! If you didn't see the previous blog post you can take a look at it here. This post will assume that you already have the reserved dough.


Sun Dried Tomato and Parmesan Bread

1 grapefruit sized piece of boule dough (1/4 of the initial batch)
1/2 cup olive oil packed sun dried tomatoes, roughly chopped
1/2 cup freshly grated parmesan cheese
olive oil

Lightly dust the dough with flour and pull from the bowl. Fold the dough under itself to form a ball.


Dust your work surface with a little flour and roll the dough out into a rectangle.


Brush the dough with a little olive oil


Scatter the sun dried tomatoes over the top


Sprinkle with the parmesan cheese


Starting at one of the short sides of the dough, roll the dough into a log. Press the seam on the bottom closed and the ends. Fold the ends under to form your loaf.


Place on a corn meal dusted pizza peel or cutting board. Allow the dough to rest for 1 hour.


When there is 20 minutes left before the dough will be ready, preheat the oven to 450 degrees with the baking stone on the center rack and a broiler pan on a lower rack. Dust the top of the loaf with a little flour and cut a few slits diagonally across the bread.


When the dough is ready slide the bread from the pizza peel into the oven. Pour 1 cup of hot water into the broiler pan and immediately close the door to trap the steam.


Bake for 30-35 minutes (mine only took 30)

Cool on a wire rack before slicing.


Enjoy!!

I promise real food tomorrow! he he