Showing posts with label bread. Show all posts

Sunday, May 29, 2011

Everything Brioche Hamburger Rolls

I've realized that in our house the nice weather = lots of grilling and salads. One of the staple foods during the summer months around here are burgers. Lots and lots of burgers. Every weekend our house seems to have a revolving door of company (which I love), but feeding them all is never an easy task. I will admit that I do keep frozen hamburgers and turkey burgers on hand for times when I have unexpected guests and nothing to feed them. If it is a planned event, or just the four of us, I like to go with homemade burgers. This last year of blogging has gotten me much more comfortable with making my own bread. One thing I hadn't gotten around to making yet were hamburger buns. I'm pretty sure I could have used a "no knead" recipe to make these, but I know how to knead bread dough and I wanted to give these a try. When I came across this recipe from The New York Times online they sounded *really* good. You can't really go wrong with brioche dough. It is soft, rich and delicious! If my house wasn't a total zoo this morning, I was considering making a video to show you how to knead the dough. I knew that it wouldn't be very helpful to you if you were to hear my little girls running around in the background playing :) I posted a video that I found on YouTube in the past that is helpful for anyone who may not be comfortable with kneading their own dough. I personally find it very relaxing and fun! It isn't difficult at all once you know the steps. Once you realize how easy it really is, you'll be so excited to start making all different kinds of breads and rolls. I hope you are all enjoying the weekend!


Brioche Hamburger Rolls
Adapted from: NY Times via
Hidefumi Kubota, Comme Ça, Los Angeles

For the dough:

  • 2 teaspoons active dry yeast
  • 1 cup warm water (not too hot or you will kill the yeast)
  • 2 1/2 tablespoons sugar
  • 1 egg
  • 2 tablespoons warm milk (microwave for about 10 seconds)
  • 1 1/2 teaspoons kosher salt
  • 3 cups bread flour
  • 1/3 cup all purpose flour
  • 2 1/2 tablespoons unsalted butter, softened
For the top of the rolls:
  • 1 egg + 1 tablespoon water (for the egg wash)
  • sesame seeds
  • poppy seeds
  • minced onion
In a glass measuring cup, mix together the warm water, yeast, sugar and milk. Stir to combine and allow to sit for 5 minutes. It should be frothy when it is done.


In a large bowl, whisk the bread flour, all purpose flour and salt. Pour the softened butter on top and work it in with your fingers. You want to see some nice crumbs form from the butter. Just use your fingertips and blend the butter throughout the flour mixture.

Beat an egg in a small dish.


Pour the yeast mixture in with the flour mixture. The recipe says to use a dough scraper to work it in, but you really could just gently work it in with a spoon. I actually used a Pampered Chef scraper to work mine in. Now pour in the egg and work that in as well. Your dough should come together fairly easily.


Flour your counter well and begin to knead the dough. You will knead for about 8 minutes, or until the dough is smooth and elastic. You don't want to over knead the dough or you will make it tough.

When you are kneading, you are basically using your left hand as a positioner for the dough and your right palm to work the dough. You will bring the dough toward you with your right hand and then your palm to push it away from you. Your left hand will hold the dough in place and then after each push of the dough away from you, you will turn it counterclockwise and knead again. Continue kneading until you feel the dough become smooth and elastic.


Here is a video that will help show you how to knead.

How to knead dough

Once the dough is ready, place it back in the bowl and cover with plastic wrap. Let the dough sit for 1-2 hours, or until it has doubled in size.

Line your baking sheet with parchment paper and divide your dough into 8 equal pieces.


Form them into balls (the size you would like your rolls) by folding the dough under itself while turning the dough in your hands. Place them 2-3 inches apart on your baking sheet and allow them to rise for 1-2 hours.


Cover them during this rise with a piece of plastic wrap that has been coated with cooking spray so it doesn't stick to the top of your rolls.


Preheat your oven to 400 degrees and place your broiler pan in the lower rack of your oven.

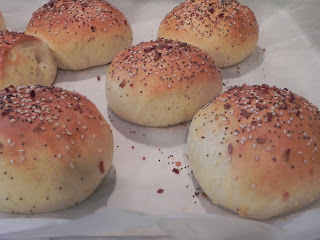
Combine the egg and water to make your egg wash and brush the top of the rolls. Sprinkle with your preferred toppings. If you want an "everything" bun, use the sesame seeds, poppy seeds, minced onion and even minced garlic. You can use whatever you like :)

When the oven comes to temperature, place the rolls in the oven and then pour some hot water in the broiler tray (about 1-2 cups). Close the door quickly (to trap the steam) and let the rolls cook for *exactly*15 minutes or until light golden brown. Mine were perfect at 15 minutes on the nose.

How fantastic do these look?!?!?

Place them on a wire rack to cool.

Serve them with your favorite burger or sandwich. Or you can do what I just did and just eat it all by itself! These were OUT OF THIS WORLD good! I *insist* that you go make them, right now!


Enjoy!!!

Monday, April 18, 2011

Roasted Garlic Potato Bread

I never ever get sick of making bread. The smell of fresh bread baking in the oven cannot be beat. I'm one of those people who would rush to the store to buy the fresh loaves of bread early in the morning while they were still warm. I am so happy that I learned to make my own bread. I used to be VERY intimidated by using yeast and even more afraid of the word "kneading". I had no clue what to do and I didn't think I would have an easy time learning. You've seen me post many times about the recipes I've found in the book "Artisan Bread in 5 Minutes A Day".

I've made quite a few of their recipes already:

Homemade Soft Pretzels
Spinach and Feta Bread
Boule Bread
Sun Dried Tomato and Parmesan Bread

I have so many of the recipes tagged in the book that I want to make! After this book I think I'm going to buy their healthy bread book and bake my way through that one. The great thing about these recipes is that each batch makes enough dough to make 4 loaves of bread. You can keep the extra dough in the fridge so you can have fresh bread every day! Next on my hit list is one of their sweet treats. I've got their cinnamon buns in my cross hairs. Anyhow - back to the Roasted Garlic Bread.


Roasted Garlic Potato Bread

  • 1 head of garlic (I did cheat here and use pre-roasted minced garlic)
  • 3 cups lukewarm water
  • 1 1/2 tablespoons granulated yeast (2 packets)
  • 1 1/2 tablespoons kosher salt
  • 1 1/2 tablespoons sugar
  • 1 cup mashed potato
  • 6 1/2 cups unbleached all purpose flour
  • cornmeal to dust the board
If you are using a whole head of garlic and roasting it yourself you want to wrap it in aluminum foil and bake it for 30 minutes at 400 degrees. Cool and then cut the top off the garlic head. The garlic should very easily slide out of the skin. You will need 2 tablespoons of the roasted garlic for this recipe. I used minced roasted garlic that I bought at the store. The bread came out fantastic, but if you have the time you should roast your own garlic. There is nothing better than fresh roasted garlic. It is sweet and incredible.


Peel, cut and boil your potatoes. You need 1 cup mashed, so depending on the size of your potatoes it might be 2-3 potatoes. Once they are fork tender, drain and mash. Set aside until they cool off slightly. It's okay to use them if they are warm, but I wouldn't use them when they are piping hot.


In a large bowl combine the yeast, salt, sugar, water and mashed potatoes and roasted garlic. Stir to combine.


Add the flour in and then stir to incorporate. Continue to stir until it seems that it is too dry and then use your hands to work in any remaining flour. You do not have to knead the dough, just work in the flour.


Cover with a kitchen towel and let it rest at room temperature until the dough rises and collapses, approximately 2 hours. Look at how much the dough rose!!


You can either use it at this point, or you can refrigerate the dough and use it any time in the next 7 days. The dough is much easier to work with when it is cold, so you can make the dough the evening before and then have it ready for you the next day.

When you are ready to bake the bread, sprinkle a little flour on the dough and cut off a piece of the dough about the size of a grapefruit (1 pound).


Smooth the dough out by folding it under itself and rotating it as your turn it in your hands. You basically want an even looking smooth round ball of dough. Let the dough rest on a cornmeal covered surface (a pizza peel if you have one) for 1 hour before baking. This is where I usually set a timer for 40 minutes. At the 40 minute mark you want to preheat the oven to 450 degrees, place a baking stone in the oven and a broiler tray on the rack below it. You also want to dust the top of the bread with a little flour and slash a slit in the shape of a cross or scallop with a serrated knife.


When the oven is preheated, slide the bread onto the hot baking stone. Pour 1 cup of hot water into the broiler tray and immediately close the oven. This traps the warm steam in the oven and keeps it moist while baking. Bake for 30-35 minutes or until deep golden brown and firm. Allow the bread of cool on a wire rack before slicing.


This bread was out of this world. The smell alone was intoxicating! The potato made the bread unbelievably moist. Another winner!


Sunday, April 10, 2011

Homemade Soft Pretzels

I always have mixed emotions when I bake things like this at home. I start out feeling a huge sense of accomplishment that I am able to make things like this in my own kitchen and then I feel angry that I never had enough faith in my cooking abilities to realize a long time ago that I could do it. Had I challenged myself a long time ago to do these things, I would have been making some seriously good things years ago! :)


A friend of mine had forwarded me a recipe for whole wheat soft pretzels and asked if I had any interest in blogging it. I was very interested in making pretzels so I decided to give it a shot. Unfortunately, that recipe was a flop. I'm not sure if it was the whole wheat that made my dough really tough and essentially a giant blobby mess or what, but there was no way I was making pretzels out of it. At that point I had my heart set on pretzels and there was no turning back. I grabbed my trusty bread baking bible otherwise known as:


I cannot say enough times how much I love this book. There has not be a single recipe in this book that hasn't turned out perfectly and it has really got me feeling confident in my bread baking abilities. Who kneads ( <--- LOL) a bread machine when you've got this book?? Not me!

Anyhow...back to my pretzels.

I whipped up the dough for these pretzels in just a few minutes and then the dough just had to sit around doing its own thing for a few hours while I got other things done. After a quick dunk in some boiling water and then 15 minutes in the oven *POOF* you've got some out of this world soft pretzels. I can honestly say that the hardest (and most amusing) thing about making these pretzels was figuring out how to make the pretzel shape. I felt ridiculous in my first few attempts...I mean, how hard could it be?? After cracking up and having my 7 year old laugh at me, Bryan stepped in and showed me how to do it! LOL How does my husband know how to make a pretzel shape and I don't? I was a quick learner and the pretzel making continued after a few more chuckles.

Homemade Soft Pretzels

  • 1 1/2 cups lukewarm water
  • 2 1/4 teaspoons granulated yeast (2 packets)
  • 2 1/4 teaspoons kosher salt
  • 2 1/4 teaspoons sugar
  • 3 1/8 cups bread flour
Start by mixing the yeast, water, salt and sugar in a large bowl.


Add the bread flour and stir with a spoon until it looks dry and shaggy.


Wet your hands slightly and then gently mix the rest of the flour in by hand. You don't have to knead the dough, just make sure all the flour is worked in.


Cover the bowl with a kitchen towel and allow it to sit at room temperature for about 2 hours. You can either make your pretzels right away, or refrigerate the dough for later. The dough is actually easier to work with when it is cold and the recipe says you can keep this dough refrigerated for use up to 14 days!!

When you are ready to make your pretzels, dust the surface of the dough with a little flour and cut off a piece of dough about the size of a small peach. The book says a 3oz piece of dough...I used my kitchen scale and the pieces I used were about 4oz-5oz each. You can do it however you like to. My recipe made 8 pretzels. Take the peach sized piece of dough and work it into a small ball by folding it under and smoothing out the top with your hands.


Elongate the ball of dough and keep rolling it on a floured surface into a 12 inch long rope.


Here comes the funny (and hard part of shaping the pretzel). Place the rope of dough into a U shape. Twist the dough around each other twice and then fold it down and press to make a pretzel.


I can guarantee you that you'll need to do this a few times to get the hang of it. Worst case scenario you'll have delicious pretzels that look absolutely nothing like a pretzel. It won't matter, you'll still eat it.

After you finish each pretzel, place it on a baking sheet and cover it loosely with plastic wrap while you make the other pretzels. Once you have shaped all the pretzels you can move on to boiling them.


You will need:
  • 8 quarts boiling water
  • 1 teaspoon baking soda
  • 1 tablespoon cream of tartar
You will also need 1 egg + 1 tablespoon water to make the egg wash and sea salt for sprinkling.

Heat the oven to 450 degrees with a baking stone on the center rack and a broiler pan on a rack below it.

Bring the 8 quarts of water to a boil and then turn the heat down to a simmer and add the baking soda and cream of tartar. You will notice it starts REALLY bubbling up after you do, so make sure to adjust the heat before you add it.


Cook the pretzels either one at a time or two at a time, making sure that the pretzels do NOT touch each other while they are boiling or they will lose their shape. Boil for 2 minutes on the first side and then flip with a slotted spoon and cook on the other side for an additional 1 minute.


Remove the pretzel from the boiling water and gently blot both sides on a kitchen towel lightly dusted with flour. You don't want to leave it sitting on the towel or it will stick to it. Just blot off the excess water and then place it on a cutting board dusted with whole wheat flour. Once all of the pretzels have been boiled, make the egg wash by mixing one egg with 1 tablespoon of water. Brush the egg wash on the pretzels and then give them a generous sprinkle of sea salt.


Place the pretzels on the hot baking stone and then pour 1 cup of hot water in the broiler pan below it (this will create steam in your oven while the pretzels bake).


Make sure you close that oven door quickly to trap the steam. Bake for 15-17 minutes or until the pretzels are a deep golden brown. Make sure to keep a good eye on them when they hit the 15 minute mark and pull them as soon as they reach the desired color.


Let them sit for a few minutes so you don't burn your mouth, but make sure to thoroughly enjoy them while they are still warm! That is the best part! What a DELICIOUS snack!