Pages

Wednesday, June 8, 2011

Fruit Fusion Bread

This recipe was really just an experiment that worked out really well! Don't ya just love it when that happens? I had a bunch of fruit and decided to make some bread out of it! If I had to do it all over again, I don't think I would change a thing! Yummy!!!!!!!!!


Fruit Fusion Bread

  • 3 large bananas, mashed
  • 1 cup strawberries, diced
  • 1/2 cup blueberries
  • 1/2 cup butter (1 stick), softened
  • 1/2 cup unsweetened applesauce
  • 1/2 cup sugar
  • 1/2 teaspoon salt
  • 1 teaspoon baking soda
  • 1 3/4 cup flour + 1 tablespoon flour to dust the fruit
  • 2 eggs
  • 1/2 teaspoon vanilla extract
  • 1 teaspoon lemon zest


Preheat oven to 350 degrees

Cream the sugar and butter in a stand mixer until smooth.


Add the mashed banana, applesauce and vanilla, stir to combine.


With the motor running, add the eggs one at a time.


Whisk the flour, baking soda and salt. Add to the banana mixture.


Cut up the fruit and stir in the lemon zest. Toss with 1 tablespoon of flour to prevent the fruit from sinking to the bottom during baking.


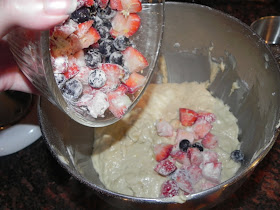
Gently fold the fruit into the mix and then pour into a greased bread pan.


Bake for 55-65 minutes or until a toothpick inserted comes out clean and the top is golden brown.

Cool completely on a wire rack before removing from the pan.


Enjoy!!!

Monday, June 6, 2011

Balsamic Round Steak with Grilled Sweet Potatoes

I have to take a minute before I share this recipe with you to give a little shout out to BzzAgent. I have been signed up with them since 2005, and during that time I have had some really great opportunities to try some amazing products for free. You might be asking yourself "what's in it for them"? The answer is quite simply that they get the word of mouth advertising from happy people walking around telling all their friends about the products that they tried. I could give you the big long list of things that I've tried over the years, but I'll just highlight a few to give you an idea.

I've tried whitening strips for my teeth, chocolate, make up, coffee, sonicare toothbrushes, cleaning products, craft products.. etc

My latest package arrived at my door just a few days ago. I was super excited to take a peek and see what I got!

The folks at Lawry's were kind enough to send an apron, two full sized marinades, a full size sample of their seasoned salt, a big stack of coupons to share with my friends and a recipe booklet!

I decided that the perfect way to put their marinade to the test was with some beautiful round steaks. I picked the round steak because it is a nice lean piece of red meat (I need to make sure I keep those 18 pounds I lost off!). The marinade was definitely a great idea! Fantastic flavor and the steak was tender as could be!


Balsamic Round Steak with Grilled Sweet Potatoes


Preheat the oven to 400 degrees

Place the steak in a shallow dish and cover with the marinade for a minimum of 30 minutes.


Slice the sweet potato, toss with the oil and sprinkle with the seasoning salt. Bake for about 30 minutes, or until the potatoes are tender and starting to get a little crisp. Move the sweet potatoes to the grill to finish them off. Brush with the seasoning salt marinade and grill for 2-3 minutes on each side.


Preheat your grill and if you have a searing burner preheat that as well.

When the grill is ready, sear the steak for 2 minutes on each side. I have a side sear burner, so I started them there and moved them to the regular grill for the rest of the cooking time.


Finish the cooking process on a lower heat, about 350 degrees).

How long you cook your steak will depend on a few different factors. Which kind of steak you are using, how thick it is and how rare or well done you prefer your meat. I found a nice website that had some great recommendations for grilling times for steak. Check out their website HERE for some great grilling tips! This is a chart from their website that you might find helpful when trying to decide how long to cook your steak.


I still prefer to use a thermometer to ensure that I don't overcook my meat. You can pick them up pretty inexpensively and they are a must have in the kitchen.

This is the one that I have, you can pick it up on Amazon HERE.

A fantastic quick and delicious meal! Thanks to Lawry's!


Enjoy!!!

If you are interested in becoming a BzzAgent visit their website HERE!

Sunday, June 5, 2011

Tropical Smoothie

I frequently just toss things in the blender to make smoothies, but I don't usually post them on the blog. My one year old is currently obsessed with just about any fruit concoction that I put in the blender, so I've been making more of them lately. I *really* liked this one and decided that I wanted to share it.

The first thing I want to mention is to never, ever throw away bananas that are getting brown. If you think that they are too mushy and are considering tossing them, don't! Unpeel them and put them in a ziplock bag and stick them in the freezer! They are absolutely perfect to use in a smoothie.


Tropical Smoothie
(makes 2 large smoothies)

  • 1 frozen banana (or fresh)
  • 3 cups watermelon, cubed
  • 1/2 cup strawberries, quartered
  • 1/2 cup blueberries
  • 8 ice cubes
  • 3 scoops Edy's Limited Edition Coconut & Pineapple ice cream
Place ice on the bottom and then cover with the fruit. Top with the ice cream and pulse until combined.


(this stuff is amazing!)

I drank mine out on the deck while I watched Isabella play golf. She wanted to show off her newly acquired skills.

Enjoy!!!!

Saturday, June 4, 2011

Roasted Vegetable Quinoa

I apologize for my absence over the last two days. I have not been feeling well and to be honest, blogging was the absolute last thing on my mind :(

This dish was an experiment. I had never made quinoa before and wanted to see what I could come up with off the top of my head. Quinoa is really like a cross between rice and couscous, in my opinion. I thought it was really good!!! You can use this in place of rice or pasta in any dish for a healthy twist.

I usually have a funny story to accompany my recipes. If you had any idea the kind of insanity that is happening in my house while I'm cooking, you would be shocked that I even blog. I can look back and laugh at this now, but when it happened it wasn't all that funny. The package of quinoa said that you need to rinse it under cold water before cooking. I knew that the quinoa was really small and I couldn't use my regular colander to strain it, so I grabbed a smaller strainer and was convinced that it was perfect to rinse the quinoa in. FAIL! The quinoa went right through the holes and all over the counter top making a giant mess. Don't make that same mistake! Put it in a bowl and then cover with water to rinse. You'll be sorry if you don't ;)


Roasted Vegetable Quinoa

  • 1 cup quinoa
  • 2 cups chicken stock
  • 1 teaspoon garlic, minced
  • 1 yellow squash, chopped
  • 1/2 of a red onion, roughly chopped
  • brussell sprouts, washed, trimmed and cut in half
  • 1 red bell pepper, cut in a large dice
  • 1 tablespoon extra virgin olive oil
  • kosher salt
  • black pepper
  • 1 14oz can diced tomatoes
  • 1 teaspoon Italian seasoning
  • 1 1/2 tablespoons fresh parsley, minced
  • 3 tablespoons Parmesan cheese
Preheat oven to 400 degrees

Rinse the quinoa in cold water and drain. Place the quinoa in a saucepan with the chicken stock and garlic, bring to a boil. Reduce heat and cook for 15-20 minutes, or until it has absorbed all of the liquid.


FYI - I was not aware it was pronounced keen-wa. I had always called it QUIN-OA. I felt super ridiculous when I realized how wrong I was...carry on.


Cut up all of the veggies and place them on a baking sheet. Toss with the olive oil. Sprinkle generously with kosher salt, pepper, and the Italian seasoning. Bake for about 30-40 minutes, or until the veggies are tender.


In a large skillet, add the can of diced tomatoes and the roasted veggies. Stir in the quinoa. Cook just until everything is warmed thoroughly. Add the parsley and Parmesan cheese.


Enjoy!!!

Wednesday, June 1, 2011

Apple Tart Tatin

I have seen this dessert made on television so many times and I have to admit that for some reason I was a little intimidated to make it. I knew that I would love it, but I was afraid to make it. All of that changed when I saw Emeril make this recipe on a recent (rerun) episode of Emeril Live. He made it look so easy and I realized that there really wasn't much to it. I looked up the recipe and decided that I had to try it. I didn't really have anything to lose...the only thing that I worried about was what the completed dessert would look like. Worst case scenario I would have a really ugly, but delicious, dessert tonight :) Hey, an ugly dessert is still dessert! I'll take it!

I don't think it looks too bad! I lucked out!


Apple Tart Tatin
Adapted from: Emeril Lagasse
  • 8 golden delicious apples -peeled, cut in half and cored
  • juice of one lemon
  • 1 cup sugar
  • 1 sheet puff pastry, thawed
  • 6 tablespoons unsalted butter
I am going to start by telling you that I did not use the golden delicious apples that this recipe called for. I actually used Granny Smith apples. Why? Well, because I had a bag of them that I wanted to use and they are my favorite! Also because I know that they are good baking apples that wouldn't fall apart. If you are going to substitute apples in this recipe, make sure it is a good baking apple!

Start out by peeling all of the apples and cutting them in half. I find it easiest to remove the cores using a melon baller and scooping out the core that way. So easy! Throw all the apples in a bowl and squeeze the juice of one lemon over them.


Melt the butter in an oven proof 9-10 inch skillet (no plastic handle!) over medium heat. When the butter has melted, sprinkle the sugar over the top of the butter. Do *not* stir the sugar and butter mixture. You can swirl the pan to move the sugar around, but do not stir it. Stirring the caramel can make the sugar crystallize.


When the sugar is a beautiful amber color remove it from the heat. Tightly arrange the apple halves round side down and fill the pan. If you run out of room and still have apples left, cut them in half and arrange them so they are flat on top of the apple halves. I actually used a 12 inch skillet, so I did not have any extra apple left to deal with. If you are using very big apples you might have too many (I used 8 small apples).


Cover the pan, reduce the heat to medium-low and cook for 15 minutes, or until the apples are soft.

Now This is what they should like this at the 15 minute mark. All of the juices should have released from the apples.

Remove the cover and cook for an additional 15 minutes.

Now the caramel should be thick and bubbly.


Roll out the puff pastry on a floured surface. Make sure that you have enough to cover the pan. Carefully place the pastry on top of the skillet and tuck the edges down into the pan and under any apples. Cut a few slits in the top of the pastry and bake in the oven for about 15 minutes, or until golden brown.


Allow the tart to cool for 5 minutes. Gently run a knife around the outside edge of the tart and then place a platter over the top of the skillet. Carefully flip the tart and pray that everything stays in tact :) Mine worked wonderfully! I attribute that to the fact that my pan was actually non-stick. I think that helps with releasing the caramel.


My photos don't do this tart justice. This pretty lil' tart looked great and tasted superb! It was super easy and had very few ingredients. You can serve this up with a big scoop of vanilla ice cream.


Enjoy!!!!